Looking to add some greenery to your small space but not sure where to start? Look no further! In this article, we will explore the most popular DIY gardening projects specifically designed for small spaces. Whether you have a tiny balcony, a small patio, or even just a windowsill, we’ve got you covered with creative and practical ideas to bring the beauty of nature into your home. So grab your tools and get ready to transform your space into a thriving oasis!

Container Gardening
Container gardening is a fantastic way to bring the joys of gardening to small spaces. Whether you have a tiny balcony, a small patio, or even just a windowsill, container gardening allows you to grow a variety of plants and flowers in a limited space. In this section, we will explore the key aspects of successful container gardening: choosing the right containers, selecting the perfect plants, designing a beautiful container garden, and important care and maintenance tips.
Choose the Right Containers
When it comes to container gardening, choosing the right containers is crucial. The containers you select will not only impact the aesthetics of your garden but also affect the health and growth of your plants. Consider the size and material of the containers. For smaller plants, opt for smaller containers, while larger plants will require bigger pots. Additionally, ensure that the containers have proper drainage holes to prevent waterlogging.
Popular options for container materials include clay pots, plastic pots, and wooden containers. Each material has its advantages and disadvantages. Clay pots, for instance, provide excellent breathability but can be heavy and brittle. Plastic pots, on the other hand, are lightweight and less prone to breaking but may not be as breathable. Lastly, wooden containers offer a rustic look and can be customized to fit your space, but they require regular maintenance to prevent rot.
Select the Perfect Plants
One of the best aspects of container gardening is the wide variety of plants you can grow. From vibrant flowers to fresh herbs and even vegetable crops, the possibilities are endless. When selecting plants for your container garden, consider the amount of sunlight your space receives and whether it’s an indoor or outdoor area. Different plants have varying light requirements, so choose plants that will thrive in your specific environment.
For shaded areas, consider plants like ferns, begonias, and impatiens that can tolerate less sunlight. If your space receives ample sunlight, explore options like marigolds, petunias, and herbs such as basil, rosemary, and mint. Remember to take into account the growth habits and ultimate size of the plants to ensure they can comfortably fit and thrive in your chosen containers.
Design a Beautiful Container Garden
Designing a beautiful container garden is both a creative and therapeutic endeavor. When planning your container garden, consider the overall style and theme you want to achieve. Do you prefer a traditional garden with classic, symmetrical arrangements? Or are you more inclined towards a modern, minimalist design with clean lines and bold colors? The choice is yours!
Start by selecting a focal point for your container garden, such as a tall plant or a unique container. Then, choose complementary plants that will enhance the focal point and add diversity to the arrangement. Consider factors like color, texture, and height when selecting the plants. For a visually appealing container garden, aim for a mix of foliage plants, flowering plants, and trailing plants to create depth and visual interest.
Care and Maintenance Tips
To ensure the success of your container garden, it’s important to provide proper care and maintenance. Regular watering is crucial, especially in dry climates or during hotter months. Check the moisture level of the soil regularly and water when it feels dry to the touch. However, be careful not to overwater, as that can lead to root rot.
Fertilizing your container garden is also essential to provide plants with the necessary nutrients. Use a balanced, slow-release fertilizer or incorporate organic matter into the soil before planting. This will support healthy growth and vibrant blooms throughout the growing season.
Finally, be vigilant about pest management. Container gardens are not immune to pests like aphids, snails, and caterpillars. Monitor your plants regularly for any signs of damage or infestation and take appropriate measures to control pests, such as introducing natural predators or using organic pest control methods.
Vertical Gardening
In small spaces where horizontal space is limited, why not go vertical? Vertical gardening is an innovative and space-saving technique that allows you to grow plants vertically, utilizing walls, fences, or specially designed structures. In this section, we will explore various vertical gardening projects, including building a vertical pallet garden, creating a hanging herb garden, constructing a wall-mounted succulent planter, and crucial tips for vertical gardening success.
Build a Vertical Pallet Garden
One of the most popular DIY projects for vertical gardening is building a vertical pallet garden. This creative and cost-effective solution utilizes recycled wooden pallets to create a vertical planting space. Start by securing a pallet vertically against a wall or fence, ensuring it’s sturdy and secure. Then, add a layer of landscape fabric or weed barrier on the back and bottom of each section to prevent soil erosion.
Next, fill each section of the pallet with a high-quality potting mix, leaving enough space for the roots of the plants. Plant your desired flowers, herbs, or even small vegetables into the pockets of soil. Consider the plants’ growth habits and position them strategically to ensure they have enough space to grow and flourish. Water the pallet garden regularly, ensuring even moisture distribution throughout the growing medium.
Create a Hanging Herb Garden
If you love cooking and using fresh herbs, a hanging herb garden is the perfect solution for small spaces. Hang your herb garden near a sunny window or on a balcony where it can receive sufficient sunlight. To create a hanging herb garden, start by selecting small pots or containers that have drainage holes at the bottom. Fill each pot with a suitable potting mix, providing excellent drainage capabilities.
Plant your herb seedlings or small herb plants into the pots, ensuring they are spaced adequately. Hang the pots from a sturdy rod or use specially designed hanging planters with hooks. Water the herbs regularly, taking care not to flood the pots but ensuring the soil is evenly moist. Harvest your herbs as needed, pinching off leaves or sprigs from the plants, and enjoy the fresh flavors they add to your culinary creations.
Construct a Wall-Mounted Succulent Planter
Succulents are incredibly popular due to their unique shapes, low maintenance requirements, and ability to thrive in various growing conditions. Creating a wall-mounted succulent planter is an excellent way to showcase these beautiful plants in a small space. To build a wall-mounted succulent planter, start with a sturdy wooden frame or a specially designed planter box with compartments.
Fill the planter compartments with a well-draining succulent potting mix, consisting of equal parts of coarse sand, perlite, and potting soil. Select a variety of succulents in different colors, textures, and shapes to create an eye-catching display. Carefully plant the succulents, ensuring they have enough room to grow. Place the wall-mounted planter in a sunny spot, ideally with partial shade during the hottest part of the day. Water the succulents sparingly, allowing the soil to dry out between waterings, as they are adapted to arid conditions.
Tips for Vertical Gardening Success
Vertical gardening is a fantastic way to maximize space and create a stunning display of plants. To ensure success with your vertical gardening projects, here are some essential tips to keep in mind:
Choose plants that are well-suited for vertical growth. Look for trailing or climbing plants that naturally grow upwards and have the ability to attach themselves or be supported by structures.
Provide adequate support for your plants. Whether it’s a trellis, stakes, or a specially designed vertical gardening structure, make sure your plants have a stable foundation to grow on.
Consider the weight and structural integrity of your vertical gardening setup. Properly secure all fixtures to walls or fences to prevent accidents or damage.
Regularly monitor the moisture levels of your vertical garden. The nature of vertical gardening can lead to faster evaporation, so ensure proper watering techniques and consider using mulch to retain moisture.
Prune and train your plants as needed. Regularly trim any dead or damaged foliage to improve air circulation and prevent disease. Guide your plants along the supports to maintain an orderly and visually appealing display.
By following these tips and getting creative with your vertical gardening projects, you can transform even the smallest of spaces into a lush and thriving green oasis.

Terrariums and Miniature Gardens
Terrariums and miniature gardens offer a whimsical and enchanting way to bring nature indoors. These self-contained ecosystems require minimal space, making them perfect for small apartments, offices, or even as tabletop decorations. In this section, we will delve into the world of terrariums and miniature gardens, exploring how to create a beautiful terrarium, design a miniature fairy garden, make a succulent dish garden, and essential tips for their care and maintenance.
Create a Beautiful Terrarium
A terrarium is a miniaturized garden enclosed within a glass container, creating a unique and captivating display. To create a beautiful terrarium, start with a clean and transparent glass container. Select a container with a wide opening for easy plant placement and to allow optimal light penetration. Ensure the container has a lid or a removable top for better humidity control.
Begin by adding a layer of small rocks or pebbles to the bottom of the container. This will create drainage and prevent excess moisture from stagnating around the roots. On top of the rocks, add a layer of activated charcoal to filter the air and reduce unpleasant odors. Then, carefully add a mixture of potting soil and sand designed for terrariums, ensuring it’s slightly moist but not soaking wet.
Now comes the fun part – selecting and arranging the plants! Choose a combination of plants that thrive in similar environmental conditions, such as ferns, mosses, and air plants. Play around with the arrangement, varying heights and textures for visual interest. Use small gardening tools or even chopsticks to position the plants precisely where you want them.
After arranging the plants, gently water the terrarium, taking care not to overwater. Close the lid or cover the container to create an enclosed environment with higher humidity. Place the terrarium in a spot where it can receive indirect sunlight, avoiding direct sunlight that could cause the glass to heat up excessively.
Design a Miniature Fairy Garden
Bring some magic and enchantment into your small space with a miniature fairy garden. These tiny landscapes are designed to resemble a fairy’s whimsical abode, complete with tiny furniture, miniature plants, and tiny accessories. To design a miniature fairy garden, start with a shallow container, such as a shallow dish or a wide planter. Ensure the container has good drainage by adding small rocks or pebbles to the bottom.
Begin by creating a base layer using a combination of potting soil and sand, making sure the soil is slightly moist. Carefully select and arrange miniature plants suitable for fairy gardens, such as tiny ferns, dwarf ivy, and different types of moss. Incorporate accessories like small fairy figurines, miniature garden furniture, and decorative stones to create a whimsical effect.
Consider creating different levels or sections within the garden using rocks or pieces of driftwood to add visual interest. Be creative and let your imagination run wild as you design and personalize your miniature fairy garden. Ensure the plants receive the appropriate amount of water, keeping the soil evenly moist without overwatering.
Make a Succulent Dish Garden
Succulents are incredibly popular for their unique beauty and ability to thrive in arid conditions. A succulent dish garden is a creative and low-maintenance way to showcase these charming plants in a small space. To make a succulent dish garden, start with a shallow container that has drainage holes at the bottom.
Fill the container with a well-draining succulent potting mix, ensuring it’s slightly moist. Select a variety of succulents in different shapes, sizes, and colors to create an eye-catching arrangement. Arrange the succulents in the container, varying heights and textures for visual interest. Leave enough space between the plants for them to grow and spread.
To add an aesthetic element, consider incorporating decorative rocks, small pebbles, or miniature figurines. These elements will enhance the overall design and provide extra interest to the succulent dish garden. Water the succulents sparingly, allowing the soil to dry out between waterings to prevent root rot. Place the dish garden in a sunny location, preferably near a window or in a well-lit area indoors.
Tips for Terrariums and Miniature Gardens
Creating and maintaining terrariums and miniature gardens requires attention to detail and understanding the unique needs of these small ecosystems. Here are some essential tips to ensure the success of your terrarium or miniature garden:
Choose plants that are well-suited for the enclosed environment within your terrarium. Look for plants that thrive in humid conditions and can tolerate lower light levels.
Avoid overwatering your terrarium or miniature garden. Since these contained environments have limited space and airflow, excess moisture can lead to mold, root rot, and the death of plants.
Regularly check the humidity levels within your terrarium and make adjustments as needed. If condensation is consistently high, consider removing the lid or top for a while to allow excess moisture to evaporate.
Use small tools or tweezers when arranging and maintaining your terrarium or miniature garden. These tools will help you position plants precisely, remove dead foliage, and minimize disruptions to the delicate environment.
Regularly clean the glass or container of your terrarium or miniature garden to remove any dust or stains. A clean glass will enhance the visibility and appeal of the plants inside.
By following these tips, you can create stunning terrariums and miniature gardens that add a touch of nature and wonder to your small space. Enjoy the beauty and tranquility these miniature ecosystems bring into your home or office.
Herb Gardening
Herb gardening is a popular and rewarding way to grow your own fresh herbs, even in small spaces. Whether you have a windowsill, a balcony, or an indoor area with sufficient sunlight, you can create a thriving herb garden. In this section, we will explore different aspects of herb gardening, including starting an indoor herb garden, building a vertical herb garden, making a hanging herb planter, and harvesting and using your herbs effectively.
Start an Indoor Herb Garden
Even if you don’t have access to an outdoor space, you can still enjoy the benefits of having fresh herbs at your fingertips by starting an indoor herb garden. The key to a successful indoor herb garden is providing sufficient light, proper drainage, and selecting the right herbs that match the conditions of your space.
Choose a sunny window that receives at least six hours of direct sunlight each day. If your chosen window doesn’t provide enough light, supplement it with artificial grow lights. Herbs like basil, thyme, and oregano thrive in 6-8 hours of sunlight, while herbs like chives, parsley, and mint tolerate partial shade.
To ensure proper drainage, select containers with drainage holes or use self-watering pots that have a built-in reservoir. Fill the containers with a well-draining potting mix specifically formulated for herbs, ensuring it remains slightly moist but not waterlogged.
Plant the herb seedlings or small herb plants into the containers at the appropriate spacing, taking into consideration the plants’ ultimate size. Water the herbs regularly, allowing the soil to dry slightly between waterings. Fertilize the herbs every few weeks with a balanced, water-soluble fertilizer to provide them with the necessary nutrients.
Build a Vertical Herb Garden
Vertical herb gardens are an excellent solution for small spaces where horizontal space is limited. These vertical structures allow you to grow an abundance of herbs in a compact and organized manner. To build a vertical herb garden, start by selecting a suitable structure, such as a wooden pallet, a hanging shoe organizer, or a vertical gardening system designed for herbs.
If using a wooden pallet, secure it vertically against a wall or fence, ensuring stability and safety. Attach landscape fabric or weed barrier to the back and bottom of each section to prevent soil erosion. Fill each section with a high-quality, well-draining potting mix, leaving enough space for the roots of the herbs. Plant your selected herb seedlings or small herb plants into the sections, ensuring adequate spacing for growth.
If using a hanging shoe organizer or a vertical gardening system, carefully position the herb plants in the designated pockets or slots. Ensure each plant has enough space and access to light and air circulation. Water the plants regularly, ensuring even moisture distribution throughout the containers or pockets. Harvest the herbs as needed, pinching off leaves or sprigs for culinary use, and enjoy the freshness they bring to your dishes.
Make a Hanging Herb Planter
For a space-saving and visually appealing herb garden, consider making a hanging herb planter. This DIY project allows you to utilize vertical space while creating an attractive display of herbs. To make a hanging herb planter, start by selecting hanging containers or small pots that have drainage holes at the bottom.
Fill the containers with a well-draining potting mix, ensuring it remains slightly moist but not waterlogged. Select herb seedlings or small herb plants that match the growing conditions of your space and your culinary preferences. Plant the herbs into the containers, spacing them adequately to allow for growth and to prevent overcrowding.
Attach hooks or ropes to the containers, ensuring they are securely fastened. Hang the herb planters from a sturdy rod or ceiling fixture, placing them in a well-lit area that receives sufficient sunlight. Water the herbs regularly, allowing the soil to dry slightly between waterings. Remember to harvest your herbs as needed, using them to enhance the flavors of your culinary creations.
Harvesting and Using Your Herbs
Once your herb garden is thriving, it’s time to harvest and enjoy the fruits of your labor. Here are some essential tips for harvesting and using your herbs effectively:
Harvest your herbs when the essential oils that give them their flavors and aromas are at their peak. The best time to harvest herbs is in the morning, after the dew has dried but before the sun is at its strongest.
Use sharp scissors or pruning shears to harvest your herbs. Avoid tearing or pulling the foliage, as this can damage the plants. Instead, snip off the leaves or sprigs just above a leaf node to encourage healthy growth.
Regularly trim your herbs to promote bushiness and prevent them from becoming woody. Frequent harvesting encourages new growth and ensures a steady supply of fresh herbs.
Wash your harvested herbs gently to remove any dirt or debris. Pat them dry with a clean towel or allow them to air dry before using them in your recipes.
Use your freshly harvested herbs immediately to enjoy their full flavors and aromas. Alternatively, store them in airtight containers in the refrigerator, taking care not to crush or bruise the herbs.
Experiment with different recipes and culinary techniques to make the most of your herb garden. Herbs can be used in marinades, dressings, sauces, soups, stews, and a variety of other dishes.
By following these tips and exploring the versatility of your herb garden, you can elevate your culinary creations and enjoy the satisfaction of cooking with fresh, homegrown herbs.

Raised Bed Gardening
Raised bed gardening is a practical and efficient way to cultivate plants in small spaces while improving soil quality and enhancing drainage. These elevated gardening beds allow you to have better control over the growing conditions and make gardening more accessible by minimizing the need for bending or kneeling. In this section, we will explore different aspects of raised bed gardening, including building a raised bed, selecting the right soil and plants, design and layout ideas for raised beds, and crucial tips for maintaining raised beds.
Build a Raised Bed
Building a raised bed is an excellent first step towards creating a thriving garden in a limited space. To build a raised bed, start by selecting the material for the bed’s structure. Options include wood (such as cedar or redwood), concrete blocks, or galvanized steel. Each material has its advantages and aesthetics, so choose the one that suits your preferences and budget.
Determine the desired size and shape of your raised bed, taking into account the available space and the amount of plants you wish to grow. Most raised beds are rectangular or square, but you can get creative with curved or irregular shapes if desired. Ensure the dimensions of the raised bed allow easy access to all sides of the garden for planting, maintenance, and harvesting.
Prepare the area where the raised bed will be placed by removing any grass, weeds, or debris. Level the ground and lay a solid foundation if necessary, especially if you are using loose or separate materials like lumber or concrete blocks. Assemble your chosen material to create the walls of the raised bed, ensuring they are securely fastened and level. Line the bottom of the bed with a weed barrier fabric to prevent weeds from growing up into the raised bed.
Select the Right Soil and Plants
The choice of soil and plants is paramount to the success of your raised bed garden. Fill the raised bed with a high-quality, well-draining soil mixture that provides adequate nutrients for your plants. Ideally, the soil mixture should consist of equal parts of compost, topsoil, and organic matter like peat moss or aged manure. Avoid using garden soil alone, as it may be too heavy and lack proper drainage.
Select plants that thrive in the growing conditions of your raised bed. Consider factors like sunlight exposure, water requirements, and the mature size of the plants. In a small space, it’s crucial to choose plants that won’t outgrow their allotted space or crowd out neighboring plants. Choose a mix of vegetables, herbs, and flowers to create a diverse and visually appealing garden.
When arranging the plants in the raised bed, consider their growth habits and spacing requirements. Aim for a balanced layout that allows enough space for each plant to grow and access sunlight and air circulation. Follow recommended planting guidelines for each specific plant, ensuring you provide the necessary depth and spacing for healthy root development.
Design and Layout Ideas for Raised Beds
Designing a raised bed garden involves careful planning and creativity. Here are some design and layout ideas to inspire your raised bed gardening project:
Divide your raised bed into separate sections or compartments to create a visually appealing layout. This can be particularly useful for separating plants with different growth habits or water requirements.
Create pathways or stepping stones between the raised beds to allow easy access for maintenance and harvesting. Consider using materials such as gravel, wood chips, or decorative stepping stones for a visually appealing effect.
Incorporate trellises or supports within the raised bed to maximize vertical space and allow climbing or vining plants to thrive. This can provide additional growing opportunities for vegetables like tomatoes, cucumbers, or beans.
Use companion planting techniques to maximize space utilization and encourage beneficial relationships between plants. For example, plant taller plants like corn or sunflowers in the north or west side of the raised bed to avoid shading smaller plants.
Consider incorporating decorative elements like ornamental grasses, flowering annuals, or even small sculptures to add visual interest and create a diverse and dynamic garden space.
Tips for Maintaining Raised Beds
Regular maintenance is essential to ensure the productivity and longevity of your raised bed garden. Here are some important tips for maintaining raised beds:
Monitor the moisture level of the soil and water the raised bed garden accordingly. Raised beds often require more frequent watering than traditional gardens, as they tend to dry out faster. Aim for moist, but not waterlogged, soil conditions.
Mulch the surface of the raised bed garden with organic matter like straw, wood chips, or compost. Mulching helps to retain moisture, suppress weed growth, and regulate soil temperatures.
Regularly weed the raised bed garden to prevent competition for nutrients and space. Weed when the soil is moist to make it easier to remove the weeds and their roots.
Fertilize your plants as needed, adhering to the specific requirements of each plant type. Use organic fertilizers to provide necessary nutrients and promote healthy growth.
Monitor for any signs of pests or diseases in your raised bed garden. Inspect the plants regularly and take immediate action if you notice any issues. Consider using natural pest control methods or organic treatments to minimize the use of chemicals.
By following these maintenance tips and incorporating creative design ideas, you can create a productive and visually appealing raised bed garden in small spaces. Enjoy the satisfaction of growing your own fresh produce and flowers while maximizing the potential of your limited gardening area.
Window Box Gardening
If you are fortunate to have windows in your small space, window box gardening is a fantastic way to add color and beauty to your home. Window boxes offer an opportunity to cultivate a variety of plants and flowers, creating a charming and lush display that enhances both the interior and exterior of your space. In this section, we will explore the art of window box gardening, including selecting the perfect window box, choosing the right plants, tips for window box maintenance, and creative ideas for window box displays.
Select the Perfect Window Box
Choosing the perfect window box is the first step towards creating a stunning window box garden. Consider the aesthetics and style of your space, as well as the practical aspects of maintaining the window boxes. Several materials are commonly used for window boxes, including wood, metal, plastic, and fiberglass.
Wooden window boxes provide a classic and rustic look, but they require regular maintenance to avoid rotting. Metal window boxes add a touch of elegance and are generally durable but may rust over time. Plastic and fiberglass window boxes are lightweight, easy to clean, and often mimic the aesthetic of wood or metal without the maintenance requirements.
When selecting a window box, ensure that it has proper drainage holes or can accommodate a drainage system. Adequate drainage is crucial to prevent waterlogging and potential damage to your plants. Consider the size of the window box, ensuring it fits your window sill securely and doesn’t obstruct the view or interfere with window functionality.
Choose the Right Plants
Choosing the right plants for your window box garden is crucial for creating a visually appealing display that thrives in the provided conditions. Consider factors such as the amount of sunlight your window receives, the presence of shade, and the orientation of your windows (north-facing, south-facing, etc.).
For windows that receive full sun or at least six hours of direct sunlight, consider plants like geraniums, petunias, zinnias, or marigolds. These flowering annuals provide vibrant colors and thrive in sunny conditions. If your windows face a more shaded direction or receive partial shade, consider plants like impatiens, begonias, or ferns that tolerate less sunlight.
Mix and match plants with different heights, colors, and textures to create interest and depth in your window box garden. Consider incorporating trailing plants like sweet potato vine or ivy to create cascading effects. Additionally, mix in foliage plants like coleus or ornamental grasses to provide contrast and visual appeal.
Tips for Window Box Maintenance
Maintaining your window box garden ensures the longevity and beauty of your plants. Here are some essential tips for window box maintenance:
Water your window box garden regularly, ensuring that the soil remains evenly moist without becoming waterlogged. Aim for consistent moisture levels, as uneven watering can stress the plants.
Fertilize your window box plants regularly to provide them with the necessary nutrients. Use a balanced, water-soluble fertilizer or incorporate slow-release fertilizers into the soil at planting. Follow the specific fertilization requirements of each plant type.
Monitor for pests and diseases regularly. Inspect your plants for any signs of infestation or disease, such as discoloration, wilting, or holes in leaves. Treat any issues promptly using appropriate organic pest control methods or treatments.
Deadhead or remove faded flowers regularly to encourage continuous blooming. This will promote new growth and keep your window box garden looking vibrant and fresh.
Prune your plants as needed to maintain their size and shape. Trim any dead or damaged foliage to improve overall plant health and appearance.
Gently clean the window box itself periodically to remove any dirt, debris, or moss buildup. This will keep your window box looking neat and prevent any potential issues like clogged drainage holes.
By following these maintenance tips and regularly tending to your window box garden, you can create a delightful display that adds a touch of color and charm to your small space.
Creative Ideas for Window Box Displays
Window box gardening opens up numerous possibilities for creative and unique displays. Here are some ideas to inspire your window box designs:
Create a monochromatic window box with a single color theme. Choose flowers in various shades of the same color, such as different shades of pink, purple, or white. This creates a visually stunning and harmonious display.
Incorporate edible plants into your window box garden. Mix herbs like basil, thyme, or rosemary with flowering plants for a functional and aesthetically pleasing arrangement. This not only adds visual interest but also allows you to enjoy fresh herbs for cooking.
Create a themed window box garden to celebrate various seasons or events. For example, plant vibrant orange and yellow flowers for a fall-themed window box, or choose red and pink blooms for a Valentine’s Day display.
Combine different plant types with varying growth habits to create a lush and layered window box garden. Choose tall plants for the back, medium-sized plants for the middle, and trailing plants for the front. This provides depth and visual interest to your window box design.
Experiment with different textures and foliage colors to add dimension to your window box garden. Mix plants with bold, glossy leaves with those that have delicate, feathery foliage for an intriguing contrast.
Consider using unconventional containers for a unique window box display. Use vintage watering cans, galvanized buckets, or even repurposed wooden crates as alternative window box containers. These distinctive containers add a touch of character and charm to your window box garden.
By embracing creativity and incorporating your personal style, you can create window box displays that enhance the beauty of your small space and elicit admiration from passersby.

Herb Knot Garden
Herb knot gardens are a delightful and visually appealing way to grow herbs in a small space. Their intricately designed patterns and arrangement of different herbs create an eye-catching and aromatic display. In this section, we will explore the art of herb knot gardening, including how to plan your herb knot garden, create a unique herb knot design, planting and maintaining your herb knot garden, and essential tips for a beautiful herb knot garden.
Plan Your Herb Knot Garden
Planning is crucial when it comes to herb knot gardens, as they require careful consideration of design elements, herb selection, and proper spacing. Here’s how to plan your herb knot garden:
Choose a suitable location for your herb knot garden. It should receive ample sunlight, preferably at least six hours a day, to ensure healthy growth and productivity of the herbs.
Measure the available space to determine the size and shape of your herb knot garden. Herb knot gardens can be circular, square, rectangular, or even created to fit specific spaces or patterns.
Research different pattern designs and motifs to find inspiration for your herb knot garden. Classic designs include spirals, Celtic or medieval-inspired patterns, and intricate geometric shapes.
Consider the growth habit and mature size of each herb when planning the design. Select herbs that are suitable for knot gardens, such as thyme, rosemary, savory, parsley, or chamomile. Choose herbs with contrasting colors and textures to create visual interest within the design.
Draw a scaled-down plan or use a garden design software to map out your herb knot garden. This will help you visualize the layout and ensure accurate spacing between the herbs.
Create a Unique Herb Knot Design
Once you’ve planned your herb knot garden, it’s time to bring your design to life. Creating a unique herb knot design requires attention to detail and careful positioning of the herbs. Here’s how to create your herb knot design:
Prepare the area where your herb knot garden will be located by removing any grass, weeds, or debris. Ensure the soil is well-prepared and free from compacted areas.
Mark the outline of your herb knot garden design using string, stakes, or even gardening hose. This will serve as a guide for planting and shaping the herbs.
Begin by planting larger herbs or those that will serve as focal points within the design. Position them strategically along the outline or within the central area of the pattern.
Gradually work your way from the center or outer edge of the design, planting the remaining herbs according to the planned spacing. Use gardening gloves or small hand tools to dig holes and place the herbs gently, ensuring the roots are covered with soil.
Consider adding decorative elements like colored gravel, stones, or even small flowering plants to accentuate your herb knot garden design. These additions can enhance the overall aesthetic and make the pattern more pronounced.
Once all the herbs are planted, water them thoroughly to settle the soil and promote root establishment. Ensure adequate moisture during the initial period to support their growth.
Planting and Maintaining Your Herb Knot Garden
Proper planting and maintenance are essential for the health and longevity of your herb knot garden. Here’s what you need to know:
Water your herb knot garden regularly to keep the soil slightly moist but not waterlogged. Monitor the moisture levels and adjust the watering frequency based on weather conditions.
Apply a layer of organic mulch around the base of each herb to suppress weed growth, retain moisture, and regulate soil temperatures.
Regularly trim and prune the herbs to maintain the desired shape and prevent them from becoming overgrown or straggly. This helps to preserve the knot design and encourages bushier growth.
Harvest the herbs as needed, pruning or pinching off leaves or stems from the plants. Utilize the fresh herbs in your culinary creations and enjoy the fragrance they bring to your space.
Monitor for pests and diseases that may affect the health of your herb knot garden. Inspect the plants regularly for signs of damage or infestation. Use organic pest control methods or treatments to address any issues.
Periodically feed your herbs with organic, slow-release fertilizers or compost to provide them with essential nutrients. Follow the specific fertilizer instructions for each herb type and avoid over-fertilizing, which can result in excessive foliage growth.
Tips for a Beautiful Herb Knot Garden
Creating and maintaining a beautiful herb knot garden requires attention to detail and regular care. Here are some important tips for a stunning herb knot garden:
Plant herbs with similar care requirements together to ensure they thrive in the same growing conditions. Group herbs with similar water and sunlight needs to ensure consistent growth and prevent any issues.
Regularly tidy up your herb knot garden by removing any dead foliage, weeds, or debris. This will keep the design looking crisp and maintain the overall aesthetic appeal.
Adjust the design as the herbs grow and mature to prevent overcrowding or shape distortion. Be ready to relocate or trim certain herbs to maintain the integrity of the knot design.
Consider incorporating fragrant herbs like lavender or chamomile near seating areas to create a tranquil and aromatic atmosphere.
Experiment with different combinations of herbs and patterns to add your personal touch to the herb knot garden. The possibilities are endless, so let your creativity guide you.
By following these tips and embracing the beauty of herb knot gardening, you can create a unique and visually stunning herb garden that becomes a focal point of your small space.
Aquaponics
Aquaponics combines aquaculture (fish farming) with hydroponics (growing plants in water) to create a mutually beneficial system. In this section, we will explore the world of aquaponics, including building your own aquaponics system, selecting the right fish and plants, maintenance and troubleshooting tips, and the benefits of aquaponics.
Build Your Own Aquaponics System
Building your own aquaponics system allows you to create a sustainable and efficient method of growing both fish and plants. Here’s how to get started with building your own aquaponics system:
Determine the scale of your aquaponics system based on the available space and your goals. You can start with a small-scale system using a fish tank and a grow bed, or go for a larger setup with multiple tanks and grow beds.
Choose the appropriate fish tank for your system, ensuring it is large enough to comfortably house the fish you intend to raise. The size of the tank will depend on variables such as the number and type of fish, water volume requirements, and space limitations.
Select a suitable grow bed for your aquaponics system. This can be a dedicated container filled with a growing medium like expanded clay pellets or gravel, or a raft system with floating boards where the plants’ roots hang directly in the water.
Design the plumbing system that will circulate water between the fish tank and the grow bed(s). This typically involves using a water pump to move the water from the fish tank to the grow bed, then using gravity to return the water back to the fish tank.
Incorporate filtration components into your aquaponics system to remove waste products and maintain water quality. This may include mechanical filters, biological filters, and solids removal processes.
Install a water heater and thermometer to maintain the optimal water temperature for both the fish and the plants. Different fish species have specific temperature requirements, so choose fish that can thrive in the conditions you can provide.
Select the Right Fish and Plants
The success of your aquaponics system depends on selecting fish and plants that are well-suited to the environment you can provide. Consider the following when selecting fish and plants for your aquaponics system:
Choose fish species that tolerate the conditions you can provide, such as water temperature, pH levels, and available space. Popular fish choices for aquaponics include tilapia, trout, catfish, and goldfish. Research the specific requirements and growth rates of each fish species before making a decision.
Select plants that can thrive with the nutrient-rich water provided by the fish waste. Leafy greens like lettuce, kale, and spinach are excellent choices for aquaponics, as they grow quickly and absorb nutrients efficiently. Herbs like basil, mint, and parsley also do well in aquaponic systems.
Consider the growth habits and spacing requirements of the plants. Some plants, like lettuce, can be grown more densely in aquaponics due to the abundant nutrients. However, other plants, such as larger herbs or fruiting plants, may require more space to reach their full potential.
Strike a balance between nutrient uptake by the plants and nutrient production by the fish. If you have an excess of fish waste, it may lead to nutrient imbalances and potential plant health issues. Regularly monitor nutrient levels and adjust fish feeding habits accordingly.
Introduce fish and plants to your aquaponics system gradually to allow them to acclimate to the new environment. Monitor water parameters and ensure timely action if any adjustments or interventions are necessary.
Maintenance and Troubleshooting Tips
Maintaining an aquaponics system requires regular monitoring and attention to prevent potential issues. Here are some important maintenance and troubleshooting tips:
Regularly test water parameters, including pH levels, ammonia, nitrite, and nitrate levels. Aim to keep the water parameters within the ideal ranges for both the fish and the plants. Make appropriate adjustments if any parameters deviate from the optimal levels.
Check and clean filters regularly to ensure proper functioning and prevent clogs. Mechanical filters may accumulate debris that needs to be rinsed or removed, while biological filters require regular monitoring to maintain healthy colonies of beneficial bacteria.
Monitor fish health by observing their behavior, appetite, and overall appearance. Any abnormal or suspicious signs should be investigated promptly to prevent the spread of diseases or illnesses.
Inspect the plants for any signs of nutrient deficiencies or overabundance. Adjust the fish feeding habits or nutrient supplementation as needed to maintain optimal plant growth and health.
Be vigilant about potential pests or invasions in your aquaponics system. Some common pests include aphids, snails, and algae. Utilize organic pest control methods or introduce natural predators to maintain a healthy ecosystem.
Benefits of Aquaponics
Aquaponics offers several advantages over traditional gardening and fish farming methods. Here are some benefits of aquaponics:
Sustainable and efficient: Aquaponics utilizes nutrient-rich fish waste to fertilize plants, eliminating the need for synthetic fertilizers. The plants, in turn, filter and purify the water for the fish. This closed-loop system conserves water and minimizes waste.
Space-saving: Aquaponics systems can be designed vertically or in compact forms, making them ideal for small spaces. They allow you to grow a significant amount of food in a limited area, making them suitable for urban environments or areas with space constraints.
Higher yields and faster growth: Plants grown in aquaponics systems have access to a constant supply of nutrients, resulting in accelerated growth rates and higher yields compared to traditional gardening methods.
No soil required: Hydroponic components of aquaponics eliminate the need for soil, reducing the risk of soil-borne pests and diseases. This makes it a clean and efficient system to cultivate plants.
Natural pest control: Maintaining a biodiverse and healthy system in aquaponics helps naturally control pests and diseases. Beneficial organisms like ladybugs or predatory insects can thrive, keeping pest populations in check.
By embracing aquaponics and building your own system, you can enjoy fresh produce, sustainable fish farming, and a unique gardening experience that combines the best elements of hydroponics and aquaculture.

Vertical Succulent Garden
Succulents are versatile and low-maintenance plants that thrive in various growing conditions. Creating a vertical succulent garden allows you to maximize space and showcase these fascinating plants in a visually stunning way. In this section, we will explore the art of vertical succulent gardening, including building a vertical succulent garden frame, selecting and arranging your succulents, maintaining and watering your vertical garden, and creative ideas for vertical succulent gardens.
Build a Vertical Succulent Garden Frame
Building a vertical succulent garden frame is an excellent way to display your succulent collection while maximizing space. Here’s how to build a vertical succulent garden frame:
Start by choosing the frame material for your vertical garden. Options include wooden pallets, picture frames, wire mesh panels, or even repurposed shelves. Consider the aesthetic appeal and durability of each material.
Prepare the chosen frame by cleaning and, if necessary, removing any existing materials or debris. Ensure the frame is sturdy and stable, as it will bear the weight of the succulents and growing medium.
Line the frame or the open spaces within the frame with a geotextile fabric or weed barrier. This will prevent the growing medium from shifting or being washed away while still allowing water drainage.
Fill the frame or the designated spaces with a well-draining succulent potting mix. This mixture should include equal parts of coarse sand, perlite, and potting soil. The soil should be lightly moist but not overly wet.
Attach a mounting bracket or secure the vertical garden frame to a wall or fence. Ensure the frame is securely fastened and level, as it will need to hold the weight of the growing medium and the succulents.
Select and Arrange Your Succulents
Succulents come in an array of colors, textures, and forms, allowing for endless possibilities when it comes to arranging them in a vertical garden. Here’s how to select and arrange your succulents:
Choose a variety of succulents that complement each other in color, texture, and growth habit. Consider their mature size to ensure they fit comfortably within the designated spaces of your vertical garden.
Play with different arrangements before planting to determine the desired positioning and arrangement of the succulents. Consider mixing tall, trailing, and rosette-forming succulents for an interesting and visually appealing display.
Plant the selected succulents into the designated spots in the vertical garden frame, ensuring they have enough space for growth and access to sunlight. Handle the succulents gently to avoid damaging their leaves or roots.
If needed, use floral wire, small pins, or even hot glue to secure the succulents in place. This can be particularly useful for trailing or hanging succulents that may need additional support initially.
Position the succulents strategically to create visual interest and aesthetic balance within the vertical garden frame. Arrange succulents of similar colors or tones together to create color blocks or group complementary colors for a harmonious effect.
Maintaining and Watering Your Vertical Garden
Although succulents are known for their ability to tolerate dry conditions, proper maintenance and watering are still essential for a healthy vertical succulent garden. Here’s what you need to know:
Water your vertical succulent garden sparingly to avoid overwatering, which can lead to root rot. Succulents prefer well-draining soil and are adapted to arid conditions. Allow the soil to dry out between waterings before providing a thorough yet controlled watering.
Monitor the moisture levels within the growing medium by occasionally pressing your fingers into the soil. Only water when the soil feels dry to the touch. Aim for even moisture distribution throughout the vertical garden.
During extremely hot or dry periods, succulents may require more frequent watering. Use a spray bottle to mist the succulents and the growing medium to provide additional moisture without soaking the soil or causing water runoff.
Be mindful of the position and orientation of your vertical garden. Succulents need ample sunlight to maintain their vibrant colors and compact growth habits. Ensure the vertical garden receives at least six hours of direct or indirect sunlight each day.
Periodically inspect the succulents for any signs of pests, disease, or stress. Minimize potential issues with proper spacing, proper air circulation, and regular removal of dead or damaged foliage.
Creative Ideas for Vertical Succulent Gardens
Vertical succulent gardens offer endless possibilities for creativity and unique displays. Here are some creative ideas to inspire your vertical succulent garden:
Create a succulent rainbow by arranging succulents of different colors in a gradient pattern. Group shades of green, blue-green, purple, and red succulents for a stunning display.
Combine different types and sizes of succulents to create a visually diverse vertical garden. Plant echeverias with trailing sedums or rosette-forming aeoniums with compact haworthias for a dynamic effect.
Incorporate other decorative elements like small sculptures, seashells, or decorative rocks to enhance the visual appeal of your succulent garden. These elements can create focal points or add a touch of whimsy to your design.
Explore unconventional containers or repurposed objects to create a unique vertical succulent garden. Consider using vintage suitcases, wooden crates, or even old picture frames as a foundation for your garden.
Combine succulents with other drought-tolerant plants like cacti or agaves to create a desert-themed or xeriscape vertical garden. This combination brings a touch of the arid landscapes to your space, even in the absence of desert-like conditions.
Experiment with different shapes and patterns within your vertical garden. Arrange succulents in geometric shapes or plant them in semi-circles or spirals. Let your creativity run wild and create a one-of-a-kind succulent masterpiece.
By embracing creativity and exploring the possibilities of vertical succulent gardening, you can create captivating and visually stunning displays that elevate the aesthetics of your small space.
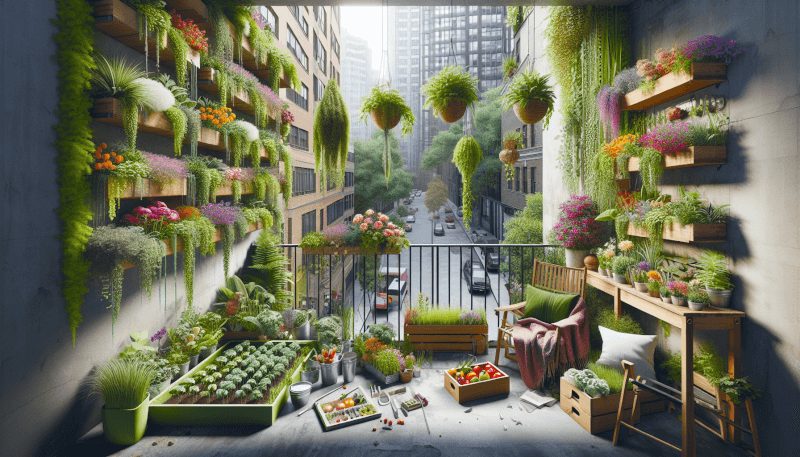
Balcony Garden
If you are lucky to have a balcony in your small space, you can transform it into a beautiful garden oasis. Balcony gardening allows you to enjoy the benefits of gardening while maximizing your limited outdoor space. In this section, we will explore different aspects of balcony gardening, including choosing the right plants for your balcony, utilizing vertical space, creating a cozy seating area, and tips for balcony gardening success.
Choose the Right Plants for Your Balcony
Choosing the right plants for your balcony is crucial to ensure successful growth and visual appeal. Consider the following factors when selecting plants for your balcony garden:
Assess the amount of sunlight your balcony receives. Different areas of the balcony may experience varying levels of sunlight throughout the day. Observe the sunlight patterns and classify your balcony as full sun, partial shade, or full shade areas.
Select plants that thrive in the sunlight conditions of your balcony. For balconies with full sun, consider sun-loving plants like geraniums, petunias, marigolds, or succulents. Partial shade areas can accommodate plants like impatiens, begonias, ferns, or herbs like mint or parsley. Full shade areas are suitable for foliage plants like caladiums, ferns, or hostas.
Consider the size of your balcony and the mature size of the plants you select. Choose plants that won’t outgrow the available space or obstruct views from your balcony. Opting for compact or dwarf varieties of plants can be a smart choice.
Evaluate the wind conditions on your balcony. High-rise balconies are often exposed to wind, which can desiccate plants’ foliage or damage delicate flowers. Choose plants that are wind-tolerant or consider installing windbreakers like trellises or screens to protect your plants.
Pay attention to the weight limit of your balcony. If you have weight restrictions, opt for lightweight containers made of plastic or fiberglass. Consider using soil alternatives like coconut coir or perlite-based growing media to reduce the overall weight of your balcony garden.
Utilize Vertical Space on Your Balcony
Vertical space is precious on a balcony, and utilizing it efficiently can significantly enhance your garden’s impact. Here are a few ideas to maximize vertical space on your balcony:
Install hanging baskets or planters from the ceiling or railings of your balcony. This allows you to grow additional plants without sacrificing valuable floor space. Select trailing or cascading plants like trailing petunias, ivy, or trailing geraniums for a cascading effect.
Use wall-mounted planters or vertical gardening systems to grow herbs, flowers, or even small vegetables vertically. There are modular systems available on the market that allow you to create custom configurations based on your preferences and available space.
Utilize wall space by attaching wire mesh, trellises, or wall-mounted planters. This allows you to grow climbing or vining plants like tomatoes, cucumber, or morning glories, which maximize the vertical space and provide a stunning display.
Incorporate balcony railing planters or window boxes. These extend the growing area beyond the boundaries of your balcony, allowing plants to cascade down or add pops of color at eye level for passersby.
Consider using plant stands or tiered shelving units to display plants vertically. This not only maximizes the available space but also adds depth and visual interest to your balcony garden.
By exploring these vertical gardening ideas, you can create a lush and vibrant garden on your balcony while maximizing space and visual impact.
Create a Cozy Seating Area
A balcony should be a place where you can relax and enjoy the outdoors. Creating a cozy seating area not only enhances the aesthetics of your balcony but also provides a comfortable space to retreat to. Here’s how to create a cozy seating area on your balcony:
Assess the available space on your balcony and determine the size and type of seating that would fit comfortably. Opt for foldable or collapsible furniture if space is limited, as they can be easily stored when not in use.
Select seating options that suit your style and preferences. From bistro sets to lounge chairs or even comfortable floor cushions, choose seating that allows you to relax and enjoy the view. Consider weather-resistant or outdoor-specific materials for durability.
Incorporate comfortable cushions, pillows, or throws to make the seating area cozy and inviting. Experiment with different colors or patterns to add personality and create an inviting ambiance.
Install shade solutions like retractable awnings, umbrellas, or bamboo blinds to provide relief from direct sunlight. This allows you to enjoy your seating area throughout the day, even during hotter hours.
Add decorative elements like lanterns, string lights, or candles to create a cozy atmosphere during evenings or nighttime. Arrange potted plants or hanging baskets around the seating area to enhance the outdoor feel.
Consider incorporating privacy screens or tall plants to create a sense of intimacy and seclusion. Balcony railings or trellises can be adorned with climbing plants or privacy curtains to provide a sense of enclosure.
Creating a cozy seating area on your balcony transforms it into a personal retreat where you can unwind, read, or simply enjoy the beauty of your garden.
Tips for Balcony Gardening Success
Balcony gardening presents its own set of challenges and considerations. Here are some important tips for successful balcony gardening:
Pay attention to water drainage and avoid water runoff onto neighboring balconies or the street below. Use saucers or liners under containers to collect excess water and prevent staining or damage.
Choose lightweight and well-draining potting soil suitable for containers. Heavy garden soil can retain too much moisture and lead to root rot. Adding perlite or vermiculite to the potting mix can improve drainage.
Regularly monitor and adjust watering schedules based on weather conditions. Balconies can be more exposed to wind or rapid temperature changes, leading to faster evaporation or drying out of the soil.
Protect your plants from extreme temperatures or frost during colder months. Consider moving more delicate or frost-sensitive plants indoors or providing frost protection with materials like burlap or frost cloths.
Be mindful of the weight limit of your balcony and the load-bearing capacity of your flooring. Distribute the weight of your plants evenly across the balcony and consider lightweight or modular containers to minimize the load.
Use organic or slow-release fertilizers to provide plants with the necessary nutrients. Regular feeding can promote healthy growth and vibrant blooms. Follow the specific instructions and recommended application rates for the selected plants.
Regularly inspect your balcony garden for pests or diseases. Early intervention is crucial to prevent the spread of pests or any damage to your plants. Utilize organic pest control methods or treatments to address any issues.
By following these tips and embracing the unique challenges of balcony gardening, you can create a beautiful and flourishing garden space within your limited outdoor area. Enjoy the relaxation and serenity that your balcony garden brings while adding a touch of nature to your small space.
Article Word Count: 3739
