If you’ve ever wanted to bring some fresh, aromatic herbs into your kitchen, then DIY herb gardening projects are the perfect solution for you. These projects allow you to create your own little green oasis right on your kitchen countertop, and the best part is that you don’t need a green thumb to get started. Whether you’re a novice gardener or an experienced plant parent, there are plenty of options to suit your skill level. With a DIY herb garden, you can enjoy the pleasure of growing and using your own herbs in your cooking, adding a burst of flavor and freshness to every dish. So why not embark on a new culinary adventure and start creating your very own DIY herb garden for your kitchen today?

Choosing the Right Herbs
Consider the lighting conditions
When choosing the right herbs for your garden, one of the most important factors to consider is the lighting conditions in your space. Most herbs thrive in sunny areas that receive at least 6-8 hours of direct sunlight each day. Some popular herbs, such as basil and rosemary, are known for their love of sun and will grow best in full sun locations. On the other hand, there are also herbs that can tolerate partial shade, such as mint and chives. Assess the lighting conditions of your garden space and select herbs accordingly to ensure they receive the necessary amount of light to thrive.
Decide on the types of herbs
Once you have considered the lighting conditions, it’s time to decide on the types of herbs you want to grow. There is a wide variety of herbs available, each with its unique flavor, scent, and benefits. You can choose culinary herbs like thyme, parsley, and dill to enhance your cooking or aromatic herbs such as lavender and lemon balm to add fragrance to your garden. Medicinal herbs like chamomile and echinacea are also popular choices for those interested in holistic remedies. Consider your personal preferences, as well as the intended use of the herbs, and select a mix that suits your needs and desires.
Think about the purpose of the herbs
Along with considering the types of herbs, it is essential to think about the purpose you have in mind for your herb garden. Are you interested in growing herbs primarily for culinary purposes, herbal remedies, or simply for their beauty? Understanding the purpose will help guide your herb selection. For example, if you plan to use the herbs for cooking, focus on varieties commonly used in different cuisines. If you want to create a calming and soothing garden, opt for herbs with relaxing scents like lavender and chamomile. Clearly defining the purpose of your herb garden will ensure a more successful and fulfilling gardening experience.
Creating a Herb Garden
Selecting the ideal containers
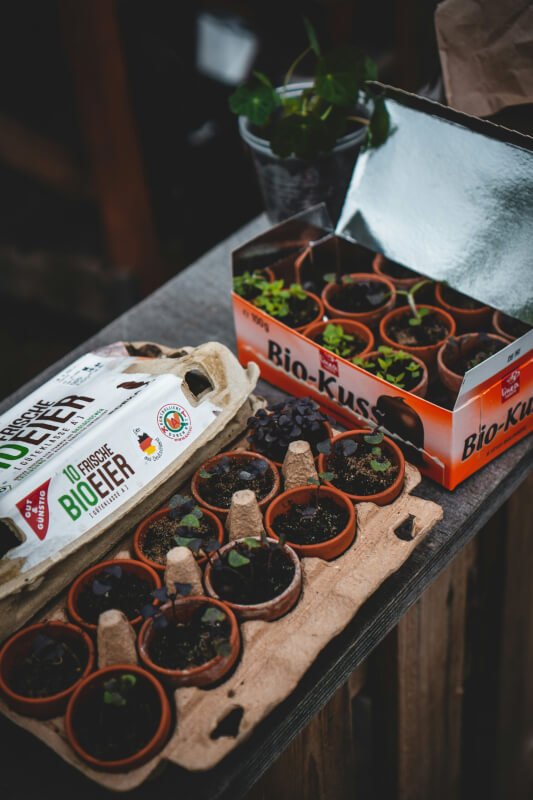
When it comes to creating a herb garden, selecting the right containers is crucial. The choice of containers will depend on various factors, including the available space, aesthetic preferences, and the types of herbs you intend to grow. Traditional terra cotta pots are a popular choice due to their natural look and excellent drainage properties. However, you can also get creative with unconventional containers like recycled cans, wooden crates, or even vertical garden walls. Whatever containers you choose, make sure they have adequate drainage holes to prevent waterlogged soil and ensure the health of your herbs.
Gathering necessary tools and materials
Before you start creating your herb garden, gather all the necessary tools and materials to make the process smooth and enjoyable. Some essential tools include a trowel for digging and planting, pruning shears for trimming and shaping herbs, and a watering can or hose for watering. You may also need potting soil, compost, and organic fertilizers to nourish your herbs. Additionally, consider using mulch to help retain moisture in the soil and suppress weed growth. Having all the necessary tools and materials at hand will save you time and effort as you set up your herb garden.
Preparing the soil
Once you have your containers and tools ready, it’s time to prepare the soil for your herb garden. Good soil preparation is essential for healthy plant growth and productivity. Start by removing any weeds or debris from the containers or garden bed. Loosen the soil with a trowel or fork to improve drainage and create a favorable environment for root growth. Depending on the quality of your soil, you may need to amend it with organic matter like compost or well-rotted manure. This will add nutrients, improve soil structure, and promote overall plant health. Give the soil a thorough watering to settle it, and you’re ready to start planting your herbs.
Starting from Seeds
Choosing quality herb seeds
Starting your herb garden from seeds allows you to experience the full cycle of plant growth and can be a rewarding experience. When selecting herb seeds, opt for high-quality seeds from reputable sources. Look for seeds that are fresh, well-packaged, and labeled with the herb’s name and variety. It is also helpful to choose seeds that are suited to your growing zone and climate to ensure better germination and overall success. Consider purchasing heirloom or organic seeds if sustainability and conservation are important to you. Remember, choosing quality seeds is the first step towards a flourishing herb garden.
Germinating the seeds indoors
To give your herb seeds the best chance of germination, it is often recommended to start them indoors before transplanting them to the garden. Fill seed trays or small pots with a good quality seed-starting mix, which provides the optimal balance of moisture retention and drainage. Plant the seeds at the recommended depth, usually around twice their size, and lightly cover them with soil. Place the trays or pots in a warm location, ideally with bottom heat, to encourage germination. It is important to keep the soil consistently moist but not waterlogged during this stage. As the seeds germinate and the seedlings emerge, provide them with adequate light to support their growth, either by placing them under fluorescent lights or near a sunny window.
Transplanting seedlings to the garden
Once your herb seedlings have developed a good root system and have grown to a suitable size, they are ready to be transplanted to the garden. Before transplanting, it is crucial to harden off the seedlings gradually. This involves gradually introducing them to outdoor conditions by placing them outside for a few hours each day, gradually increasing the duration over a week. This process helps the tender seedlings adjust to the fluctuating temperatures, wind, and sunlight in the garden. When you are ready to transplant, choose a day with mild weather and dig a hole that is slightly larger than the root ball of the seedling. Gently loosen the roots before placing the seedling in the hole, backfill with soil, and firm it gently. Water the newly transplanted seedlings thoroughly to help them establish in their new home.
Propagating Herbs
Taking herb cuttings
Propagating herbs through cuttings is an excellent way to expand your herb garden without relying on seeds. Many herbs, such as mint, rosemary, and sage, can be easily propagated from stem cuttings. To take cuttings, choose healthy stems from the parent plants, preferably ones that are actively growing. Use clean and sharp pruning shears or scissors to make a clean cut just below a node, which is where leaves emerge from the stem. The cutting should ideally be 4-6 inches long, with 2-3 pairs of healthy leaves. Remove the lower set of leaves and any flowers or buds, as they will divert energy from root development.
Preparing cuttings for propagation
Once you have taken the cuttings, it is essential to prepare them for propagation. Dip the cut end of each stem into a rooting hormone powder or gel, available at gardening stores, to promote root development. While rooting hormones are not always necessary, they can significantly improve the success rate of rooting. Shake off any excess hormone and gently insert the lower end of the cutting into a pot filled with a well-draining rooting medium, such as perlite or vermiculite. Make sure at least one node is buried below the soil level. Lightly firm the soil around the cutting to provide stability.
Rooting cuttings in water or soil
After preparing the cuttings, you have the option to root them in either water or soil. If you choose to root them in water, place the cuttings in a glass or jar filled with clean, room temperature water. Position the container in a location with bright, indirect light and make sure to change the water every few days to prevent stagnation. Rooting in water allows you to see the progress of root development and is particularly suitable for herbs like basil and mint. If you prefer rooting in soil, keep the cuttings in a warm and humid environment, such as inside a propagation dome or covered with a plastic bag. Mist the foliage regularly to maintain humidity and encourage root growth. Over time, the cutting will develop roots, and you can transplant it into a container or directly into the garden.

Vertical Herb Garden Ideas
Building a DIY vertical herb wall
If you have limited space or simply want to add an eye-catching element to your herb garden, a DIY vertical herb wall is an excellent option. To build a vertical herb wall, you will need a sturdy wooden frame or a vertical garden system designed for herbs. Attach containers or pockets to the frame, ensuring they have drainage holes to prevent waterlogging. Fill each container with potting soil, and plant your desired herbs in each pocket. It is advisable to choose herbs with compact growth habits for vertical gardening, such as thyme, oregano, and parsley. Hang the vertical herb wall in a sunny location, and water the plants regularly to keep them healthy and thriving. Enjoy the visual appeal and convenience of having your herb garden right at eye level.
Repurposing old wooden pallets for a herb garden
Another creative way to maximize vertical space in your herb garden is by repurposing old wooden pallets. Start by cleaning the pallet thoroughly, removing any nails or splinters that could be harmful. Stand the pallet upright, with the slats facing horizontally, and secure it to a wall or fence using sturdy hooks or brackets. Fill each slat with potting soil, ensuring it is firmly packed. Plant your chosen herbs in the gaps between the slats, making sure to provide enough space for their roots to grow. As the herbs establish, water them regularly, taking special care to water the top portion as gravity may cause the water to run down and miss some plants. This repurposed wooden pallet herb garden provides an attractive and space-saving solution for small gardens or urban living.
Hanging herb planters
If you have limited floor or ground space, hanging herb planters offer a practical and decorative way to grow herbs. There is a wide variety of hanging planters available, ranging from traditional pots with built-in hooks to intricate macramé hangers. Choose hanging planters that match the style and aesthetic of your garden or home. Plant your herbs in the planters, ensuring they have suitable drainage holes. Hang the planters in a location that receives adequate sunlight and is easily accessible for watering and maintenance. Remember to check the soil moisture regularly and water accordingly to prevent the herbs from drying out. Hanging herb planters not only maximize space but also add a touch of greenery and charm to any area.
Creating a Windowsill Herb Garden
Choosing the right windowsill location
If you have limited outdoor space or live in an apartment, creating a windowsill herb garden is a perfect solution. Start by choosing the right windowsill location that receives ample sunlight throughout the day. South or west-facing windows are usually the best options, as they provide the most direct sunlight. If your windowsill does not receive enough light, consider using grow lights to supplement the natural light. Keep in mind that herbs require a minimum of 6-8 hours of sunlight per day to thrive. With the right location and sunlight, your windowsill herb garden will flourish and provide fresh herbs at your fingertips.
Using small containers or window boxes
When creating a windowsill herb garden, it is crucial to choose the right containers. Opt for small, well-draining containers or window boxes that fit comfortably on your windowsill. Make sure the containers have drainage holes to prevent waterlogging and root rot. You can use a variety of materials for your containers, including ceramic, clay, or even repurposed tins or mason jars. Fill the containers with a high-quality potting mix, specially formulated for herbs or vegetables, to provide the necessary nutrients and drainage. Plant your chosen herbs in the containers, leaving enough space for their growth. Arrange the containers on your windowsill, and watch as your indoor herb garden brings life and freshness to your kitchen.
Maintaining the herbs indoors
To ensure the success of your windowsill herb garden, it is essential to maintain the herbs properly. Water the herbs when the top inch of soil feels dry, being mindful not to overwater. Inadequate drainage can lead to root rot, so make sure excess water can escape through the drainage holes. Regularly check for pests, such as aphids or spider mites, and promptly address any issues. Indoor humidity can be too low for some herbs, especially during the winter months, so misting them with water occasionally can help increase the humidity around the plants. Rotate the containers every few days to ensure even growth, as plants tend to lean towards the light source. With proper care, your windowsill herb garden will provide you with fresh and flavorful herbs year-round.

Herb Gardening in Small Spaces
Utilizing vertical space with a ladder garden
When space is at a premium, utilizing vertical space is key to creating a thriving herb garden. A ladder garden is a creative solution that allows you to grow herbs vertically while adding an attractive architectural element to your space. Start by selecting a sturdy ladder preferably made of wood. Clean and sand the ladder to remove any rough edges or splinters. Place the ladder against a wall or fence, ensuring it is stable and secure. Attach small pots or containers to each rung of the ladder using strong hooks or brackets. Fill each container with potting soil and plant your chosen herbs. It is essential to choose herbs with compact growth habits and shallow root systems for this type of vertical gardening. Regularly water the plants, making sure the excess water drains away. The ladder garden provides an innovative solution for small gardens or urban areas, allowing you to maximize your planting space while showcasing your herbs in a visually appealing way.
Building a compact herb spiral
A compact herb spiral is another space-saving option for small gardens. This design allows you to grow a variety of herbs in a small circular bed, utilizing vertical space effectively. To build a compact herb spiral, start by marking the desired location and shape of the bed in your garden. Using bricks or rocks, create a spiraling structure, stacking them on top of each other as you go. Make sure the structure is sturdy and stable. Fill the bed with a mixture of compost, soil, and sand to provide the necessary nutrients and good drainage. Plant your herbs in different areas of the spiral according to their sun and moisture requirements, with the ones needing the most sun at the top and those preferring shade at the bottom. Water the herbs regularly, taking care not to overwater as excess water may drain down and oversaturate the bottom herbs. The compact herb spiral offers a unique and functional way to grow a variety of herbs in a limited space.
Creating a balcony herb garden
If you have a balcony or small outdoor space, creating a balcony herb garden allows you to enjoy fresh herbs and add greenery to your urban environment. Start by assessing the amount of sunlight your balcony receives throughout the day. Depending on the orientation of your balcony, it may receive full sun, partial shade, or mostly shade. Choose herbs that are suited to the specific lighting conditions of your balcony. Select containers that fit the available space, ensuring they have proper drainage. Balcony rail planters, hanging baskets, or window boxes can be great options for maximizing space. Fill the containers with a well-draining potting mix and plant your herbs. Water the herbs regularly, paying attention to their individual moisture requirements. With a well-designed balcony herb garden, you can transform your outdoor space into a tranquil oasis and enjoy fresh herbs just steps away from your kitchen.
DIY Herb Labels and Markers
Designing customized herb labels
Designing customized herb labels is a fun and aesthetic way to organize your herb garden. There are various options for creating personalized labels that reflect your gardening style and creativity. One simple and cost-effective method is to use wooden paint stirrers or popsicle sticks. Paint the sticks with chalkboard paint or acrylic paint, and once dry, write or draw the names of the herbs on them using chalk or a permanent marker. Another option is to use small rocks or pebbles as labels. Paint the rocks with weather-resistant acrylic paint or use a permanent marker to write the herb names. You can also get crafty and design labels using printable templates, scrapbook paper, and laminating sheets. Whichever method you choose, customized herb labels will not only help you identify the herbs but also add a personal touch to your garden.
Making markers from recycled materials
If you are passionate about sustainability and recycling, making herb markers from recycled materials is a great way to reduce waste and add a unique touch to your garden. Look around your house for materials that can be repurposed into herb markers. Wine corks, for example, can make charming and eco-friendly markers. Simply insert a wooden skewer or bamboo stake into the cork and label it with a permanent marker. Another idea is to use old silverware as herb markers. Flatten spoons or forks with a hammer and write the herb names on the flattened surface using metal paint or a permanent marker. You can also recycle old CD or DVD cases by cutting them into small squares and writing the herb names on them. The possibilities for making herb markers from recycled materials are endless and allow you to showcase your creativity while being environmentally conscious.
Adding decorative elements to the markers
Adding decorative elements to your herb markers can be a fun way to personalize your garden and enhance its visual appeal. Consider incorporating natural elements such as dried flowers, herbs, or small pinecones to create a rustic and charming look. Attach these elements to the markers using twine, hot glue, or wire. Another option is to use colorful beads, buttons, or small charms to add a pop of color and reflect your personal style. You can also get crafty and create miniature decorative designs or illustrations on the markers using paint, markers, or pens. Adding decorative elements to your herb markers not only helps you distinguish between different herbs but also adds a touch of whimsy and creativity to your garden.

Protecting Your Herbs
Implementing natural pest control methods
To protect your herbs from pests without resorting to harmful chemicals, it is important to implement natural pest control methods. One effective technique is companion planting, where certain plants are grown together to repel pests or attract beneficial insects. For example, planting marigolds near your herbs can repel aphids and other harmful insects. Additionally, interplanting herbs like basil, parsley, or dill can help deter pests and attract beneficial insects such as ladybugs and lacewings. Another natural pest control method is handpicking pests when you see them. Regularly inspect your herbs for signs of infestation and remove any insects manually. You can also create homemade insecticidal sprays using ingredients like neem oil, garlic, or chili pepper to deter pests. By implementing natural pest control methods, you can protect your herbs without compromising the ecosystem or your health.
Creating a physical barrier with netting or mesh
If your herb garden is susceptible to pest attacks, creating a physical barrier using netting or mesh can be an effective solution. Many pests, such as birds, rabbits, and insects, can damage or consume your herbs. To protect your herbs from birds, cover the plants with bird netting or attach it to a frame surrounding the garden bed. Make sure the netting is taut and secured to prevent birds from getting entangled. For smaller pests like insects and rabbits, use fine mesh or wire cloches to cover individual plants or rows. This will create a physical barrier that prevents pests from reaching the herbs while still allowing sunlight and air circulation. Keep in mind to remove the netting or mesh periodically to allow for pollination and to access your plants for maintenance.
Using companion planting techniques
In addition to repelling pests, companion planting is also beneficial for attracting beneficial insects that can help control pests naturally. By strategically planting herbs and flowers that attract beneficial insects, you can create a symbiotic ecosystem in your herb garden. For instance, planting flowers like calendula, cosmos, or zinnia near your herbs can attract pollinators like bees and butterflies. These pollinators not only help with pollination but also prey on pest insects. Additionally, planting herbs like dill, fennel, or coriander can attract beneficial insects such as ladybugs and lacewings, which feed on aphids and other harmful pests. Companion planting is a sustainable and natural way to create a balanced and thriving herb garden while minimizing the need for chemical pest control methods.
Harvesting and Using Fresh Herbs
Knowing when to harvest herbs
Knowing when to harvest your herbs is crucial to maximize their flavor and potency. Each herb has different optimal harvesting times, so it is important to research the specific requirements of your chosen herbs. In general, herbs are best harvested in the morning, after the dew has dried but before the sun is too hot. This is when the essential oils responsible for the herbs’ flavor and aroma are at their peak. Harvest by cutting or pinching off individual leaves or stems from the plant. Regular harvesting promotes bushier growth and prevents the herbs from becoming overgrown and woody. Remember to leave enough leaves or stems on the plant to sustain its growth. By harvesting your herbs at the right time, you can ensure the best quality and flavor for your culinary creations and herbal remedies.
Properly drying and storing harvested herbs
Once you have harvested your herbs, it is essential to properly dry and store them to preserve their flavors and medicinal properties. The most common method for drying herbs is air drying. Remove any excess dirt, bugs, or damaged leaves from the harvested herbs and bundle them together, tying the stems with twine or rubber bands. Hang the bundles upside down in a cool, dry, and well-ventilated area away from direct sunlight. The herbs should be completely dry before storing, which can take anywhere from a few days to a few weeks depending on the herb and environmental conditions. Once dry, remove the leaves from the stems and store them in airtight containers, preferably glass jars, away from heat, light, and moisture. Label each container with the name and date to ensure freshness. Properly dried and stored herbs can be enjoyed throughout the year, adding flavor and aroma to your culinary creations and making your own herbal remedies.
Utilizing the herbs in cooking and home remedies
One of the most rewarding aspects of herb gardening is using the fresh herbs in cooking and home remedies. Culinary herbs can elevate the flavors of your dishes, adding a fresh and aromatic touch. Experiment with different combinations of herbs to create unique and flavorful recipes. Fresh herbs like basil, parsley, and dill can be used in salads, pasta sauces, marinades, and soups. Aromatic herbs like rosemary, thyme, and sage are excellent for seasoning roasted meats and vegetables. Medicinal herbs like mint, chamomile, and lavender can be used to brew refreshing teas, create soothing salves, or infuse oils. The benefits and applications of herbs are vast, and the possibilities are endless. Incorporating fresh herbs from your garden into your daily life allows you to experience their full potential and enjoy the fruits of your gardening labor.

